DIY Roland R-BUS Cable – Build Your Own for About €20
Finding an original R-BUS cable for vintage Roland gear has become increasingly difficult. The official cable, such as the Roland RBC‑5, has been discontinued for years, and when they do appear on the second-hand market they often sell for high prices.
Fortunately, you can easily build your own R-BUS cable with inexpensive parts and a little bit of soldering (or screw-terminal breakout boxes). In the video above I show how to build one for around €20, and it only takes about an hour.
What is R-BUS?
R-BUS is Roland’s proprietary digital audio connection used on several studio products such as digital mixers, recorders, and synthesizers. The connection carries:
- 8 channels of two-way digital audio
- MIDI communication
- Synchronization and control signals
It uses a 25-pin DB25 connector and a crossover wiring configuration, meaning the pins are mirrored between the two ends of the cable.
This is important: an ordinary DB25 cable or SCSI cable will not work, even though the connector looks identical.
Parts You Need
- 1x DB25 cable (cheap used printer cable works great)
- 2x DB25 breakout boxes or solder-cup connectors
- Small screwdriver or soldering iron
- The R-BUS pinout diagram (see below)
Using breakout boxes makes the process much easier because you don’t need to solder the tiny pins.
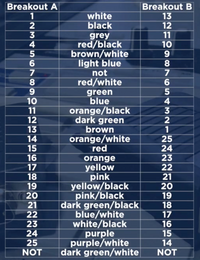
R-BUS Cable Pinout
The R-BUS cable uses a crossover wiring scheme between the two DB25 connectors.
Typical wiring:
Connector A Connector B
Pin 1 - Pin 13
Pin 2 - Pin 12
Pin 3 - Pin 11
Pin 4 - Pin 10
Pin 5 - Pin 9
Pin 6 - Pin 8
Pin 7 - Not connected
Pin 8 - Pin 6
Pin 9 - Pin 5
Pin 10 - Pin 4
Pin 11 - Pin 3
Pin 12 - Pin 2
Pin 13 - Pin 1
The remaining pins mirror in the same way across the connector rows. Essentially, the cable crosses the signal lines between both connectors, which is why one connector usually appears flipped compared to the other.
Step-by-Step Build
- Cut off the original DB25 connectors from a standard DB25 cable.
- Strip the outer shielding back about 2–3 cm.
- Open the breakout boxes (or prepare your solder connectors).
- Connect each wire according to the R-BUS pinout.
- Close the breakout boxes and test the cable.
If you wired everything correctly, you now have a fully functional Roland R-BUS cable at a fraction of the cost of an original one.
Compatible Roland Equipment
- Roland VS-series recorders
- Roland V-Mixers
- Roland XV-5080
- Roland MV-8000 / MV-8800
- Roland VSR-880 / VSR-2480
These devices use R-BUS to transfer multiple digital audio channels and MIDI data between units.
Final Thoughts
R-BUS is a great technology, but the cables have become rare and expensive. Building your own is easy, inexpensive, and keeps classic Roland gear usable for many years to come.
If you want to see the full process, watch the video below where I demonstrate exactly how I built mine.